We have all been there. You head to the garden centre in May, full of hope, and come home with a car boot full of vibrant petunias and trailing lobelia. You spend an afternoon potting them up, and for two weeks, your front door looks like something from a glossy magazine. Then, life gets busy. A heatwave hits, or perhaps a week of relentless British rain, and suddenly your masterpiece looks like a collection of crispy brown twigs.
It is heartbreaking to see your hard work and money wither away, but I promise you that it is easier than you think to keep these displays looking lush. Hanging baskets are essentially small, suspended islands. They are completely dependent on us for their survival because they cannot reach their roots into the cool, damp earth. Once you understand a few simple tricks about how they eat and drink, you can create a display that stays stunning until the first frosts arrive in October.
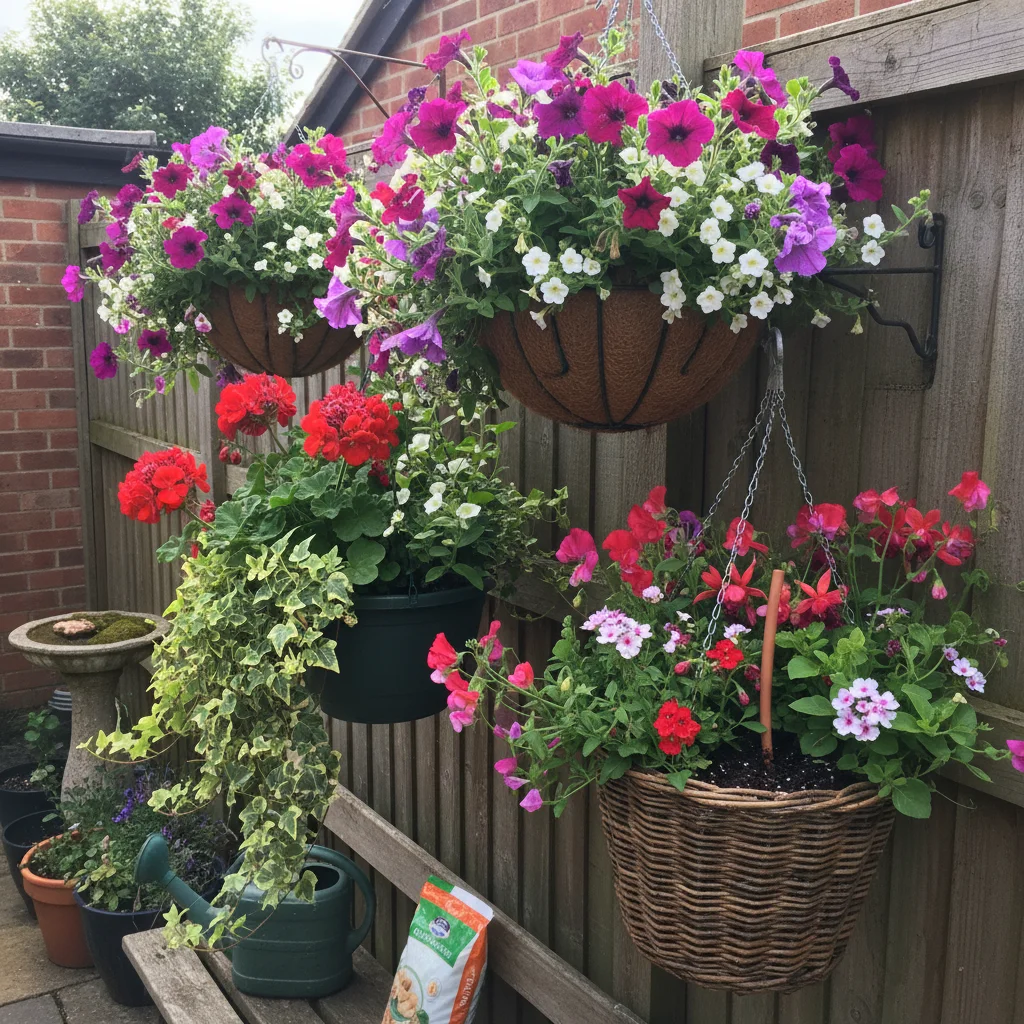
You do not need a massive garden or decades of experience to master this. Whether you have a tiny balcony in a city or a small cottage plot like mine in Yorkshire, hanging baskets are the perfect way to add vertical colour. They lift the eye, brighten up dull brickwork, and can even be used to grow a bit of food. Let’s look at how we can move past the "crispy twig" phase and move toward a season of non-stop blooms.
Why hanging baskets often fail

The biggest reason baskets fail is that they simply run out of resources. Because they are hanging in the air, they are exposed to the wind from all sides, which dries out the compost much faster than a pot sitting on the ground. Most people also choose baskets that are far too small. A tiny 10-inch wire basket might look cute, but it holds so little soil that it can dry out completely in just a few hours on a sunny afternoon.
Another common pitfall is the "plant it and forget it" mentality. In a typical UK summer, we might get a heavy downpour and assume our baskets are well-watered. In reality, the lush canopy of leaves often acts like an umbrella, shedding the rain away from the basket and leaving the roots bone dry underneath. Understanding that these containers are high-maintenance by nature is the first step to making them low-effort in practice.
Finally, we often ask too much of the compost. A basket packed with ten or twelve hungry plants will exhaust all the nutrients in the soil within about six weeks. If you aren't topping up those nutrients, the plants will stop flowering and start to look yellow and tired. It isn’t that you lack a green thumb; it’s just that your plants are hungry.
Choosing the right basket for your space
Before you buy your plants, you need to pick your vessel. I always recommend going as large as your bracket will safely support. A 14-inch (35cm) or 16-inch (40cm) basket is the "Goldilocks" size for most UK homes. It is big enough to hold plenty of moisture-retaining compost but not so heavy that it will pull the screws out of your wall after a rainstorm.
You generally have two choices: traditional wire baskets or solid plastic ones. Wire baskets allow you to plant through the sides, creating a "ball of colour" effect, but they dry out very quickly. Solid plastic baskets, often with built-in water reservoirs, are much more forgiving for busy people. If you live in a particularly windy spot, a solid-sided basket will protect the roots from that drying breeze.
If you are using a wire basket, you will need a liner. You can buy pre-formed coco liners, but I’ve always found that a thick layer of traditional sphagnum moss looks more natural and holds moisture better. If you want to be extra thrifty, you can even use a layer of wool or an old woollen jumper, which is fantastic for insulation and moisture retention.
The essential kit for success
Before we get our hands dirty, it helps to have everything ready on the potting bench. Having the right ingredients in your mix from the start will save you hours of watering later in the season. You don't need expensive gadgets, just a few staples that make the environment inside the basket much more stable.
- A sturdy 14-inch or 16-inch basket and a strong wall bracket.
- Good quality peat-free multi-purpose compost.
- A handful of water-retaining granules to act as tiny sponges.
- Slow-release fertiliser pellets or "plugs" to provide steady food.
- A plastic saucer or a piece of bin liner to place in the bottom of the basket.
- A mix of "thriller, filler, and spiller" plants.
Preparing your compost mix
The compost is the life support system for your plants. Straight out of the bag, most multi-purpose compost is great, but we can make it even better. I like to mix my compost in a large bucket or wheelbarrow before it goes into the basket. This ensures that the fertiliser and water granules are evenly distributed rather than sitting in one clump.
Adding water-retaining granules is a game-changer for UK gardeners. These tiny crystals swell up into a gel when wet, holding hundreds of times their weight in water. They then slowly release that moisture back to the roots as the soil dries out. It can be the difference between a wilted plant and a thriving one if you’re a few hours late with the watering can.
Another secret tip is to place a small plastic saucer or a circle of plastic (like a cut-up compost bag) at the very bottom of the liner. This creates a small internal reservoir. When you water, instead of the liquid running straight out the bottom and onto your shoes, it pools in that saucer, giving the roots more time to soak it up.
Selecting plants that thrive together
Choosing the plants is the most exciting part, but it pays to be strategic. We want a mix of heights and habits. The "thriller" is your upright centrepiece, the "fillers" are the mounding plants that cover the soil, and the "spillers" are the beautiful trailers that tumble over the edges. When you combine these, you get that professional, high-end look.
When you are at the garden centre, look for healthy, bushy plants rather than the ones with the most flowers. A plant with lots of green growth and plenty of un-opened buds will settle in much faster than one that has already spent its energy blooming in a tiny nursery pot. If you are growing in a shady spot, focus on Begonias and Fuchsias; for a sunny south-facing wall, go for Geraniums and Petunias.
- Surfinia Petunias: These are the royalty of trailing plants and will easily grow a metre long.
- Bacopa: A wonderful "spiller" with tiny white or blue flowers that fills every gap.
- Fuchsias: Perfect for those slightly shadier corners of the garden.
- Lobelia: The classic blue filler that adds a soft, misty look to the basket.
- Tumbler Tomatoes: If you want something edible, these trail beautifully and provide a snack every time you walk past.
How to plant for a full look
Start by sitting your basket on a large empty pot or a bucket to keep it steady while you work. If you are using a wire basket, fill it with compost up to the first level of the wire. If you want a really full look, you can tuck small plants like Lobelia through the sides of the liner. Gently wrap the root ball in a bit of newspaper to help it slide through the hole without damaging the leaves.
Once the sides are planted, add more compost until you are about two inches from the rim. Arrange your main plants on top while they are still in their pots to see how they look. Put your "thriller" in the middle and space your "fillers" and "spillers" around the edge. Aim for a slightly crowded look; hanging baskets are one of the few places where we ignore the usual spacing rules because we want instant impact.
When you are happy with the arrangement, take them out of their pots and plant them firmly. Fill in any gaps with extra compost, pressing down gently with your fingers to remove large air pockets. Leave about an inch of space between the soil surface and the top of the basket. This is the "watering gap"—if the soil is level with the rim, the water will simply run off the top before it can soak in.
Watering and feeding like a pro
This is the part where most baskets meet their end. During a warm UK July, a hanging basket may need watering twice a day—once in the morning and once in the evening. The best way to check is the "finger test." Stick your finger an inch into the soil; if it feels dry, it needs a drink. If the basket feels light when you lift it slightly from below, it is definitely thirsty.
When you water, do it slowly. Give the basket a little soak, wait a minute for it to sink in, and then give it some more. You want to see water starting to drip out of the bottom. This ensures the entire root ball is saturated, not just the top layer. Avoid watering the leaves and flowers directly, as this can lead to scorching in the sun or fungal problems in the damp.
Feeding is just as vital. Even if you used slow-release pellets, I highly recommend a liquid feed once a week from July onwards. A high-potash feed, like the one you use for tomatoes, is perfect. It encourages the plant to put its energy into making more flowers rather than just more green leaves. It’s like a shot of espresso for your petunias.
Keeping the display going until autumn
To keep your basket looking fresh, you need to be a little bit ruthless. This means "deadheading"—removing the faded flowers before they turn into seed pods. If the plant thinks it has successfully made seeds, it will stop flowering. By pinching off the dead blooms, you trick the plant into producing more and more flowers in an attempt to reproduce.
Around mid-August, baskets can sometimes start to look a bit "leggy" or tired. Don't be afraid to give them a light haircut. Trimming back trailing plants by a few inches can encourage a new flush of growth and keep the basket looking neat. If one plant has died completely, just pull it out and tuck a fresh one from the garden centre into the gap.
As the nights get cooler in September, your basket will naturally start to slow down. You can reduce the watering, but keep up the feeding to squeeze out those last few weeks of colour. Many baskets will keep going right until the first hard frost hits. When that happens, you can compost the annual plants, clean out the basket, and get ready for a winter display of pansies and ivy.
The joy of a successful hanging basket is that it greets you every time you come home. It’s a little burst of nature at eye level that proves you don't need an estate to be a gardener. By choosing a large basket, using a good compost mix, and staying on top of the watering, you’ll have a display that is the envy of your street all summer long. Now, grab your trowel and let’s get planting!