
It is a common sight for any gardener: a hedge that looks lush and vibrant on the outside but reveals a skeleton of brittle, brown branches when you part the foliage. While it can be alarming to see so much dead wood in the heart of your garden’s boundary, this phenomenon is often a natural response to the environment. However, it can also signal that your maintenance routine needs a slight adjustment to keep the plants healthy for the long term.
Understanding why this happens is the first step toward fixing it. Whether you are dealing with a classic Leylandii, a formal Box hedge, or a sturdy Yew, the principles of internal health remain largely the same. We want our hedges to be more than just a green screen; they should be living, breathing ecosystems that provide privacy and a haven for local birds and insects.
Understanding why hedges turn brown inside
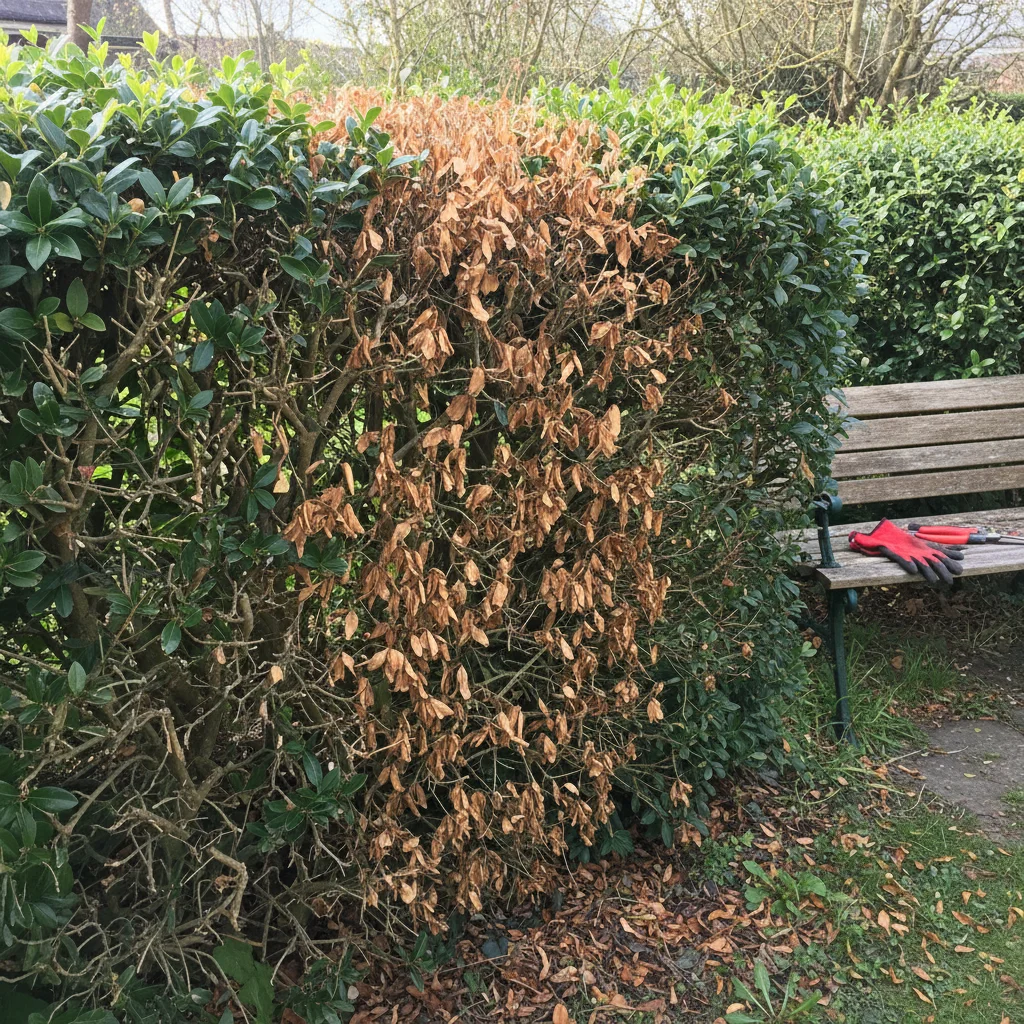
The most frequent cause of browning inside a hedge is simply a lack of sunlight. Plants are incredibly efficient at managing their energy resources through a process called senescence. When the outer layer of a hedge becomes too thick, it acts like a blackout curtain, preventing sunlight from reaching the inner branches.
Because the plant cannot photosynthesise in these shaded areas, it stops sending energy to those leaves. Over time, the inner foliage dies off and drops away, leaving a hollow, brown interior. This is particularly common in fast-growing evergreens that haven't been thinned out regularly.
In many cases, this isn't a sign that the plant is dying. It is merely the plant focusing its growth where the light is most abundant. However, if the browning starts to move toward the outer tips or appears in distinct patches, we need to look closer at pests, diseases, or environmental stressors that might be at play.
How pruning mistakes cause internal browning
Many of us are guilty of "tight" pruning, where we use garden shears to create a perfectly smooth, flat surface on the hedge. While this looks neat in the short term, it creates a very dense "shell" of foliage. This shell is so thick that air and light cannot penetrate even a few centimetres into the plant's structure.
Poor airflow is just as damaging as a lack of light. Without a breeze moving through the branches, humidity stays trapped inside the hedge. This creates a damp microclimate that is the perfect breeding ground for fungal spores and rot, which can quickly turn healthy green wood into a brittle brown mess.
To prevent this, we need to move away from only shearing the surface. Incorporating "thinning cuts" helps to break up that solid wall of green. By removing a few larger branches entirely, you create small windows that allow light and air to reach the centre, encouraging the plant to maintain some internal growth.
Identifying pests and diseases in your hedge
If the browning is accompanied by sticky residue or visible dieback on the tips, you might be dealing with the Cypress aphid. These small, brownish insects are active from late spring and suck the sap from the branches. They are particularly fond of Leylandii and Western Red Cedar, often causing large brown patches that do not regrow.
Another common culprit, especially in Box hedges (Buxus sempervirens), is Box blight. This fungal disease thrives in the UK's damp climate and causes leaves to turn brown and fall off, often leaving black streaks on the stems. It is a serious issue that requires quick intervention to prevent it from spreading through the entire hedge.
We must also consider the health of the roots. Phytophthora root rot is a soil-borne disease that attacks the root system, often in heavy clay soils that become waterlogged during our wet winters. Because the roots are damaged, they can’t transport water to the foliage, leading to a general browning that often starts from the inside or bottom of the plant.
Signs your hedge needs attention
Knowing what to look for can help you catch problems before they become terminal. Keep an eye out for these specific indicators during your seasonal garden checks:
- Brittle branches that snap easily when bent.
- A fine, white or grey fungal coating on the inner stems.
- Small, dark spots on the leaves or needles.
- Patches of "sooty mould" which often follows an aphid infestation.
- Discoloured or weeping bark near the base of the main stems.
Environmental stress and soil health
The soil is the foundation of everything in the garden, and hedges are no exception. A hedge is essentially a row of hungry plants competing for the same limited pool of nutrients and water. If the soil is depleted or bone-dry, the plant will shed its inner leaves to protect the growing tips.
Drought stress is a major factor in the UK, especially during dry spells in spring when the plants are putting on new growth. Even if it has rained, the thick canopy of a hedge can act like an umbrella, shedding water away from the root zone. You might think the ground is wet, but the soil directly under the hedge remains parched.
Conversely, if your garden has heavy soil, the roots may be sitting in cold, stagnant water. This lack of oxygen causes the roots to die back, which manifests as browning in the foliage. Improving the soil structure with organic matter can help balance these extremes, providing better drainage while also holding onto necessary moisture.
Steps to restore a browning hedge
The first step in restoration is to clear out the "duff"—the dead needles and leaves trapped inside the branches. Reach into the hedge (wearing gloves and long sleeves) and gently pull out the loose brown material. This immediately improves airflow and allows you to see the true state of the internal wood.
Once the centre is clear, you can assess the pruning. If you are working with a species that can regrow from old wood, such as Yew or most deciduous hedges like Beech or Hornbeam, you can prune quite hard. Cutting back into the brown areas will stimulate dormant buds to burst into life once the light reaches them.
However, be very careful with most conifers like Leylandii or Lawson Cypress. These plants generally do not regrow from old, brown wood. If you cut back past the green growth, you will be left with a permanent brown hole. For these plants, the goal is to thin the outer green layer very carefully to let light in without exposing the dead interior.
Feeding and mulching for long term health
After cleaning and pruning, you need to give the hedge the nutrients it needs to recover. I always recommend applying a balanced, slow-release fertiliser in early spring. Look for something with a good balance of Nitrogen for leaf growth and Potassium for overall plant health, often labelled as a 10-10-10 or 7-7-7 NPK ratio.
Avoid using synthetic fertilisers if you can; instead, opt for organic options like seaweed meal or poultry manure pellets. These feed the soil biology as well as the plant. Spread the feed along the base of the hedge, extending out as far as the drip line of the branches, and lightly hoe it into the surface.
Following your feed, apply a thick layer of mulch. A 5-7cm layer of well-rotted garden compost or bark chippings is ideal. This mulch serves multiple purposes: it suppresses weeds that compete for water, it keeps the root zone cool, and it slowly breaks down to improve the soil structure. Ensure you keep the mulch a few centimetres away from the main trunks to prevent bark rot.
Species specific care for conifers and box
Conifers are the most prone to internal browning because of their dense growth habit. If you have a conifer hedge, you must be disciplined with your pruning. Never prune in the heat of summer or during a drought, as this increases the risk of "scorch." Aim for a late spring or early autumn trim when the weather is cooler and more humid.
For Box hedges, the approach is different. Because of the risk of Box blight, you should only prune in dry weather. Always disinfect your shears with a mild bleach solution or surgical spirit between different sections of the hedge. This prevents you from accidentally spreading fungal spores from a sick area to a healthy one.
If you find that your Box hedge is consistently browning despite good care, it may be time to consider the Box tree caterpillar. These green caterpillars can strip a hedge of its leaves in days. Look for tell-tale webbing between the leaves and small green droppings. Biological controls, such as Nematodes, are a fantastic, chemical-free way to manage these pests.
Managing water and drainage
To truly fix a browning hedge, you must master the art of watering. As I mentioned, the "umbrella effect" means your hedge might be thirsty even in a typical British summer. Instead of a light daily sprinkle, give the hedge a deep, thorough soaking once or twice a week. This encourages the roots to grow deep into the soil where they are more protected.
A leaky hose or "soaker hose" laid along the base of the hedge is the most efficient way to water. It delivers moisture directly to the soil, reducing waste through evaporation and keeping the foliage dry, which helps prevent fungal diseases. If you can, use harvested rainwater from a butt to reduce your environmental footprint.
If your soil is the problem, you may need to take more drastic action. For waterlogged areas, consider digging a small trench or installing a French drain a metre or so away from the hedge to lead excess water away. Adding grit or sharp sand to the planting holes of any replacement plants will also help ensure they don't suffer the same fate as their predecessors.
By taking a methodical approach to light, air, and soil health, you can stop the internal browning from spreading and encourage your hedge to thrive. A well-maintained hedge is a beautiful, functional part of the garden that will provide a lush green backdrop for many years to come. Start by clearing out that dead material this weekend, and you’ll be well on your way to a healthier, more resilient garden boundary.