The British obsession with a perfectly manicured lawn is well-documented, but our climate often makes that dream difficult to maintain. Between the waterlogging of a typical February and the parched, brown patches of a dry July, keeping real turf looking pristine is a full-time job. It is no surprise that many of us are looking toward synthetic alternatives to provide that year-round verdant look without the relentless cycle of mowing, feeding, and weeding.
As a horticulturist, I have a deep-seated love for the biology of real grass, but I also recognise that modern life and specific garden conditions sometimes call for a different approach. Artificial turf has come a long way from the abrasive, neon-green plastic of the past. Today’s products are sophisticated, multi-tonal, and designed to withstand the unique challenges of the UK weather, provided they are installed with technical precision.
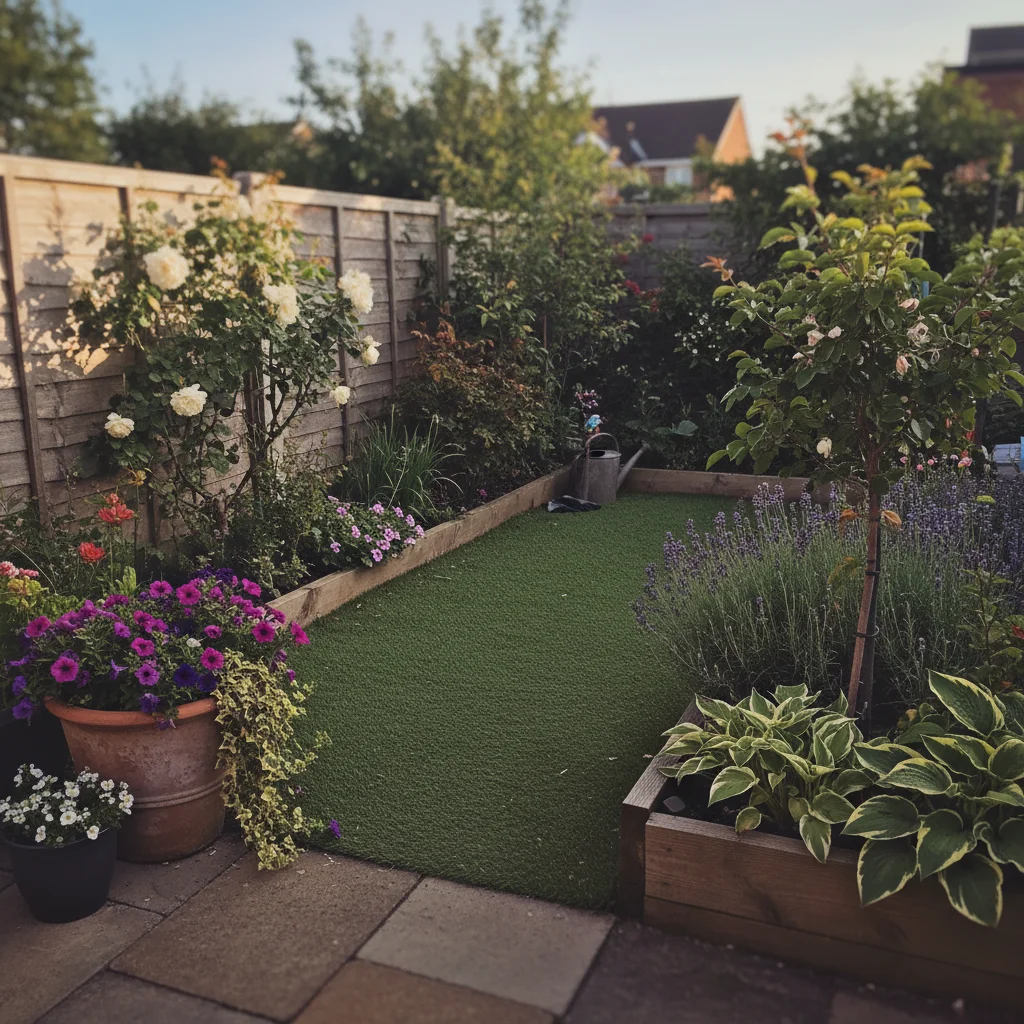
When artificial grass suits your garden
There are several scenarios where synthetic turf genuinely outshines the real thing, particularly in smaller urban plots. If you have a north-facing garden heavily shaded by walls or tall trees, real grass will often become thin, mossy, and pale despite your best efforts. Artificial grass provides a consistent aesthetic in these low-light areas, ensuring the garden feels like an inviting outdoor room rather than a damp bog.
High-traffic areas also benefit significantly from a move to synthetic materials. If you have young children or energetic dogs, a small real lawn can quickly turn into a mud bath in the autumn and winter months. Artificial turf allows for outdoor play 365 days a year without the risk of muddy footprints being trailed through the house. It is also an excellent solution for roof terraces or balconies where the weight of soil and the logistics of mowing make real grass impractical.
We must also consider accessibility. For gardeners who find the physical demands of pushing a mower or kneeling to pull weeds increasingly difficult, artificial grass offers a way to enjoy a beautiful garden space with minimal physical strain. It allows the focus to shift toward more enjoyable tasks, like tending to container plants or pruning ornamental shrubs in the borders.
The importance of base preparation
The secret to a long-lasting artificial lawn is not the grass itself, but what lies beneath it. You cannot simply roll out synthetic turf over existing grass or bare soil and expect it to look good for more than a few weeks. Without a solid, permeable base, the surface will eventually become uneven, develop dips where water collects, and potentially allow weeds to push through the backing.
Preparation begins with an excavation, typically removing the top 75mm to 100mm of existing turf and soil. This creates a "tub" that we then fill with layers of aggregate to ensure stability and drainage. We start with a heavy layer of MOT Type 1 or crushed stone, which is compacted using a vibrating plate compactor. This provides the structural integrity of the lawn, ensuring it doesn't shift or sink over time.
On top of the heavy aggregate, we apply a finer layer of "grano" dust or sharp sand, usually around 20mm to 25mm thick. This layer is smoothed and compacted to create the final level. It is essential to get this surface perfectly flat but with a very slight fall—perhaps 1 in 100—to encourage water to move toward your drainage points rather than sitting in the centre of the lawn.
Mastering drainage and permeability
In the UK, drainage is our primary concern when installing any non-natural surface. We often experience heavy downpours that can quickly overwhelm poorly prepared ground. Most high-quality artificial grasses are manufactured with a perforated backing, allowing water to pass through the "carpet" and into the sub-base below. However, this only works if the sub-base itself is built to handle the volume.
If your garden has heavy clay soil, you may need to take extra precautions. Clay holds onto water tenaciously, which can lead to the sub-base becoming saturated. In these instances, we often recommend a deeper layer of clean, angular stone rather than standard MOT Type 1, as the gaps between the stones provide more "void space" for water to sit while it slowly infiltrates the ground.
You should also be mindful of where the water goes once it leaves the lawn area. Ensure that the levels of your new installation do not direct runoff toward the foundations of your house or your neighbour’s property. Integrating a French drain—a trench filled with gravel and a perforated pipe—along the lowest edge of the lawn is a professional touch that prevents waterlogging in the surrounding flower beds.
Choosing the right turf for your needs
When selecting your turf, don't just go for the softest feel or the longest pile height. A very long pile (40mm or more) can look lush initially, but it is more prone to "flattening" over time, especially in areas where people walk or sit. For a standard family garden, a pile height between 30mm and 35mm usually offers the best balance between a realistic look and long-term resilience.
Look closely at the yarn shape and the "thatch" layer. The thatch is the curly, brownish fibres tucked down near the backing that mimic the dead grass found in a real lawn. This adds to the realism and helps support the upright green blades. Higher-quality yarns are often "C" or "W" shaped in cross-section, which gives them a structural memory, helping them spring back into place after being stepped on.
Essential tools for the job
Installing artificial grass requires a specific set of tools to ensure a professional finish. While you can hire the heavy machinery, the hand tools are what define the final look.
- A vibrating plate compactor (whacker plate) for the sub-base.
- A heavy-duty turf cutter to remove the old lawn quickly and cleanly.
- A sharp utility knife with plenty of spare blades for precision trimming.
- A notched trowel for spreading adhesive on joining tapes.
- A stiff-bristled broom or a power brush for the final "bloom" of the fibres.
- A grit spreader for even distribution of the kiln-dried sand infill.
Achieving invisible joins
The most common mistake in DIY installations is visible seams. To avoid this, you must ensure that the "pile" of both pieces of grass is running in exactly the same direction. When you place two pieces together, you should trim a few millimetres off the edge of each piece to ensure you are joining fresh backing, not the frayed factory edge.
We use a specialised jointing tape and a two-part weather-resistant adhesive. The tape is laid flat on the ground between the two pieces, and the glue is spread evenly across it. You then carefully fold the edges of the grass onto the glue, being extremely careful not to get any adhesive on the green fibres themselves. Once joined, it is best to weigh the seam down for a few hours while the glue cures to ensure a permanent bond.
Maintenance and cleaning routines
While artificial grass is low maintenance, it is certainly not "no maintenance." To keep it looking its best and to maximise its lifespan, you need to clear organic debris regularly. Leaves, twigs, and seeds that fall onto the lawn can break down and turn into a thin layer of compost within the pile. If left alone, this provides a foothold for weeds to germinate.
A quick sweep with a stiff broom once a week is usually enough to remove debris and keep the fibres standing upright. For deeper cleans, especially if you have pets, you can use a dedicated artificial grass cleaner or a very mild solution of washing-up liquid. This helps to neutralise odours and remove any stubborn dirt. Avoid using a pressure washer on a high setting or held too close, as this can dislodge the sand infill or damage the backing.
Managing pets and wildlife
Pet owners often worry about the hygiene of synthetic turf. Most modern grasses are pet-friendly and won't be discoloured by urine. The key is regular rinsing. If your dog has a favourite spot, a quick splash with the garden hose will wash the urine through the perforated backing and into the sub-base. For solid waste, simply remove it as you would on a real lawn and spot-clean the area if necessary.
From a wildlife perspective, we must acknowledge that a synthetic lawn doesn't offer the same habitat as a living one. To compensate, I always recommend surrounding your artificial lawn with rich, biodiverse borders. Plant a mix of nectar-rich flowers, shrubs, and perhaps a small tree. This ensures that while your lawn is practical for your needs, your garden as a whole still supports the bees, birds, and butterflies that are so vital to our ecosystem.
Lifespan and environmental considerations
A high-quality artificial lawn, installed correctly, should last between 15 and 20 years. The main factor in its longevity is the UV stability of the plastic. In the UK, our sun isn't as intense as in southern Europe, but over two decades, inferior plastics will become brittle and fade. Always check that your chosen product has a solid UV guarantee.
Eventually, the lawn will reach the end of its life. As someone who cares deeply about sustainability, I encourage you to look for products that are increasingly recyclable. Some manufacturers are now moving away from latex backings toward all-polypropylene designs, which are much easier to recycle at specialist facilities. When the time comes to replace it, ensure you dispose of the old turf through a reputable waste contractor who can divert it from landfill.
By following these principles of preparation and care, you can create a functional, beautiful space that serves your lifestyle. Whether it's providing a safe place for children to play or simply giving you a green view to enjoy from the kitchen window, artificial grass is a practical tool in the modern UK gardener's arsenal. Take your time with the base, keep it clear of debris, and you will have a lawn that looks its best regardless of what the British weather throws at it.