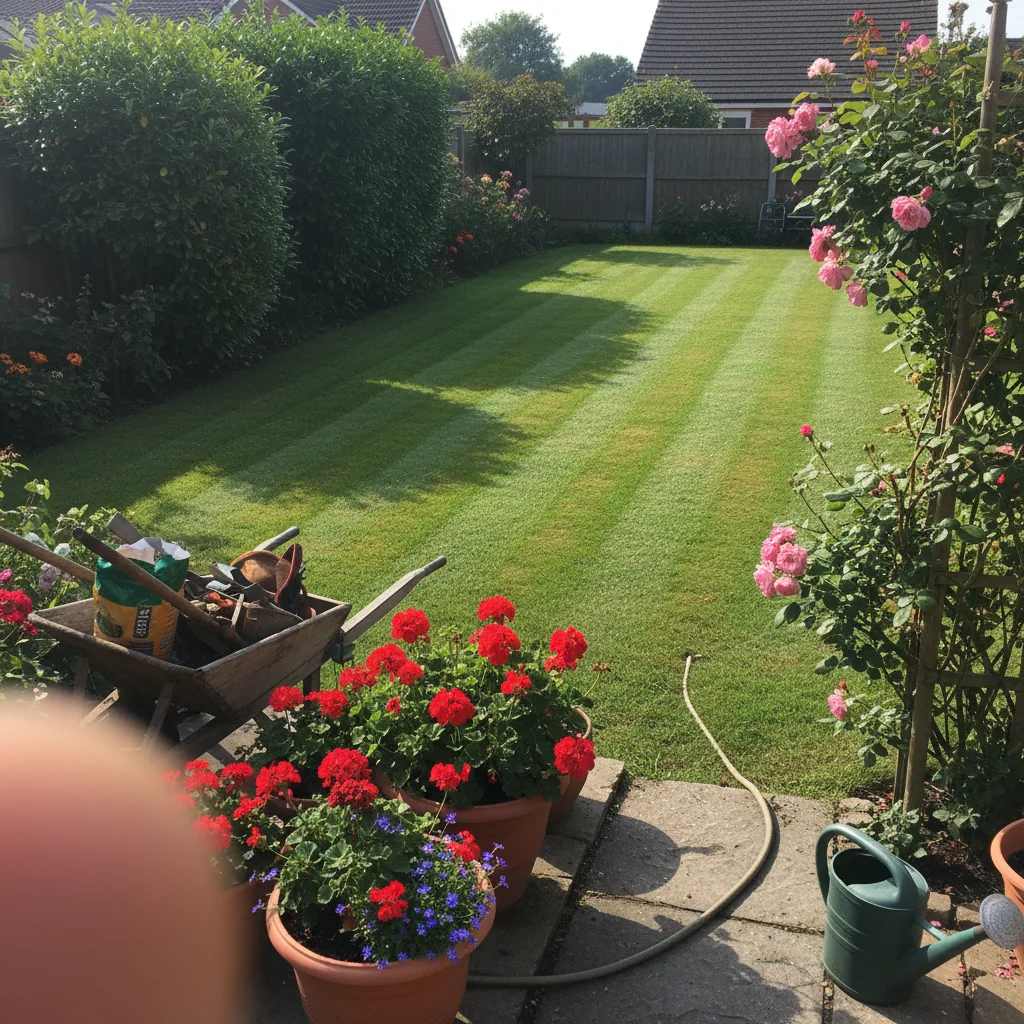
There is something deeply satisfying about looking out over a freshly striped lawn. It evokes the prestige of a premiership pitch or the manicured grounds of a National Trust estate, yet the secret to achieving it is surprisingly straightforward. You don’t need a team of groundskeepers to transform your garden; you simply need the right technique and a basic understanding of how grass responds to pressure.
Striping is more than just a cosmetic trick. It’s a sign of a healthy, well-maintained lawn that has been cut with care. When you stripe your lawn, you are effectively telling a story of your garden’s health, showing off the density of the sward and the richness of the colour. It’s an achievable goal for any UK gardener willing to spend a little extra time on their weekly mow.
In this guide, we will look at the mechanics of light and shadow that create those iconic bands. We will also cover the essential equipment you need and the horticultural preparation required to make those stripes really pop. By the time you finish reading, you will have the confidence to turn your back garden into a professional-looking masterpiece.
How Lawn Stripes Work
The stripes you see aren't caused by different types of grass or varying heights of cut. They are actually an optical illusion created by the way light reflects off the blades of grass. When the grass is bent towards you, it appears darker because you are seeing the shadows under the blades and the full depth of the green.
When the grass is bent away from you, it reflects more light off the flat, shiny surface of the blade, making it appear a much lighter green. By alternating the direction in which you mow, you create these contrasting light and dark bands. The sharper the bend in the grass, the more pronounced the stripe will be.
This is why the direction of the sun matters when you are admiring your work. A lawn that looks spectacular from your patio might look quite different when viewed from the bottom of the garden. We aim to align the stripes with your primary viewpoint to ensure the highest visual impact throughout the day.
The Best Mowers for the Job
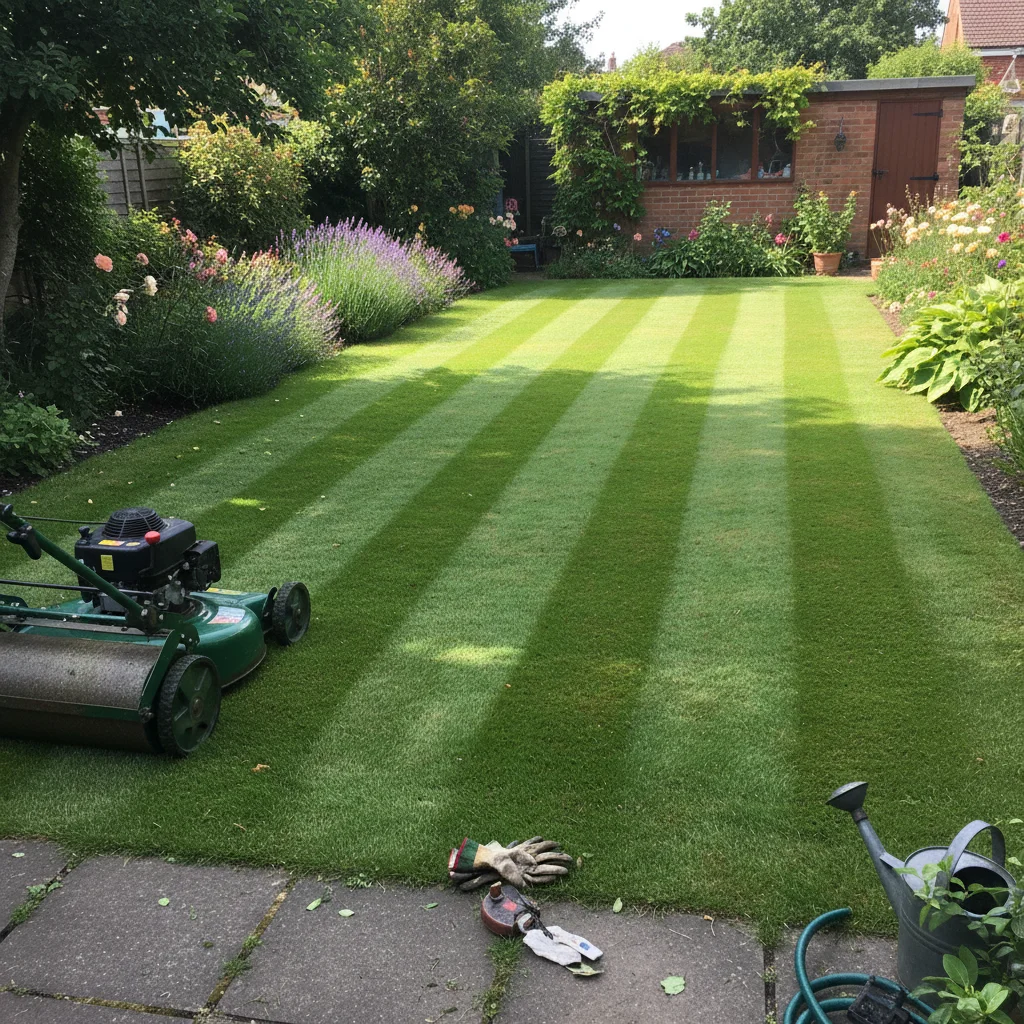
To create a lasting stripe, you need a mower equipped with a rear roller. As the mower passes over the grass, the blades cut the height, and the heavy roller immediately follows, pressing the grass flat in the direction of travel. Without a roller, the grass will simply stand back up, and your stripes will vanish within an hour.
In the UK, we generally choose between two types of mowers for this task: the cylinder mower and the rotary mower with a rear roller. Cylinder mowers are the traditional choice for fine turf, using a scissor-like action to snip the grass. They often have front and rear rollers, which provide the most definition and allow for a very low, precise cut.
Rotary mowers are more common in domestic gardens because they handle longer grass and uneven ground more effectively. If you want stripes with a rotary mower, you must ensure it is a "rear-roller" model. These machines use a high-speed rotating blade to chop the grass and a heavy integrated roller at the back to create the pattern.
| Mower Type | Best For | Stripe Definition |
|---|---|---|
| Cylinder Mower | Flat, fine lawns and luxury fescues | Excellent |
| Rotary with Roller | Family lawns and slightly uneven ground | Very Good |
| Push/Manual Roller | Small gardens and eco-friendly choices | Good |
| Standard Rotary | General tidying without patterns | Poor |
Preparing Your Grass for Striping
You cannot achieve professional stripes on a lawn that is struggling with weeds, moss, or poor soil health. Before you even think about the pattern, we need to ensure the "canvas" is ready. This starts with a healthy root system and a dense sward of grass. If your lawn is patchy, the stripes will look broken and messy.
In early spring or autumn, I recommend scarifying your lawn to remove thatch—that layer of dead organic matter that sits on the soil surface. Thatch acts like a sponge, preventing water and nutrients from reaching the roots. Removing it allows the grass to grow more thickly, which provides more surface area for the roller to press down.
Aeration is also vital for a striped finish. Over time, the weight of a mower (especially one with a heavy roller) can compact the soil. Compacted soil starves roots of oxygen and prevents drainage. Use a garden fork or a hollow-tine aerator to spike the lawn every few years, ensuring the soil remains friable and healthy.
The Step by Step Striping Method
Once your lawn is healthy and your mower is ready, it is time to start the process. Timing is important; never try to stripe a lawn when the grass is wet. Not only will the cut be ragged, but the wet clippings will clump, and the roller will struggle to create a clean, crisp bend in the blades.
- Clear the area of any stones, twigs, or children's toys that might interfere with your straight lines.
- Mow the perimeter of your lawn first, doing two full laps to create a "turning zone" at each end.
- Pick a straight edge to start from, such as a fence line or a straight path, to act as your guide.
- Mow your first row with precision, keeping your eyes about two metres ahead of the mower to maintain a straight line.
- Turn on the perimeter and align the edge of your mower with the edge of the previous row.
- Overlap slightly to ensure no thin strips of uncut grass are left between your bands.
When you reach the end of a row, lift the front of the mower slightly as you turn in the perimeter zone. This prevents the roller from scuffing the grass as you pivot. Once you have completed the entire lawn, you may want to do one final lap around the perimeter to tidy up the turn marks and frame your work.
Maintaining Your Professional Finish
The key to keeping those stripes looking sharp is regular maintenance. During the peak growing season, you should aim to mow at least once a week. This keeps the grass at a consistent height and reinforces the "memory" of the bend in the blades. If you let the grass grow too long, the weight of the blades will cause them to flop over naturally, ruining the pattern.
Be careful with your cutting height. I always advise following the "rule of thirds": never remove more than one-third of the grass blade in a single session. If you scalp the lawn, you remove the leafy part of the plant that creates the reflection, leaving you with a brown, stubbly mess that won't stripe at all.
You should also consider the health of the plant by using a balanced fertiliser. A high-nitrogen feed in the spring will encourage lush, green growth, while an autumn feed with more potassium will strengthen the roots for winter. Healthy grass is more resilient to the pressure of the roller and will hold its shape for longer.
Troubleshooting Common Issues
If your stripes look "wobbly," it is usually because you are looking down at the mower rather than ahead at the horizon. It is much like driving a car; if you focus on the bonnet, you will veer. Pick a fixed point in the distance, like a specific fence post or a tree, and walk directly towards it to keep your lines true.
Sometimes, you might find that the stripes aren't very visible even with a roller. This is often due to the grass type. Tougher, more upright grasses like Perennial Ryegrass stripe beautifully, while softer, creeping grasses can sometimes be more stubborn. In these cases, you might need to increase the weight of your roller or lower the cutting height slightly, provided the soil is level.
Finally, remember to vary your striping direction every few weeks. If you always mow in the exact same tracks, you can cause the grass to lay permanently flat, which is known as "lapping." This can encourage certain weeds and make the grass more susceptible to disease. Switching to a diagonal pattern or mowing at a 90-degree angle every third mow keeps the grass upright and healthy.
Achieving a professional finish is a rewarding way to spend a Saturday afternoon. By focusing on the health of your soil and the precision of your movement, you can create a garden that is the envy of the neighbourhood. As the sun begins to set and the shadows lengthen, those stripes will deepen, providing the perfect backdrop for a well-earned rest in your garden.