We have all been there. You walk past a gorgeous fuchsia on a neighbour’s balcony or spot a particularly lush rosemary bush in a friend's small courtyard, and you wish you had one just like it. Usually, that means a trip to the garden centre and a dent in your monthly budget. But for those of us gardening in the city, where space is tight and every penny counts, there is a much better way to fill our pots.
Propagating plants from cuttings is essentially the art of making clones. You take a small piece of a parent plant and encourage it to grow its own roots. It sounds like high-level science, but it is actually one of the most basic and rewarding parts of gardening. You don’t need a greenhouse or a massive potting shed to do this. I’ve successfully raised dozens of new plants on a narrow kitchen windowsill and a tiny north-facing balcony.
The beauty of this method is that it costs absolutely nothing. If you have a pair of scissors and a bit of compost, you are ready to go. It is also a fantastic way to ensure you have backup plants. If a harsh London frost takes out your favourite pelargonium, having a few small cuttings tucked away on a sunny ledge indoors means you won't have to start from scratch next spring.
Why propagation is the ultimate urban garden hack
When you are gardening in containers or on a balcony, you are often limited by what you can carry up the stairs or fit in a small car. Buying large, established plants is heavy work and expensive. By starting with cuttings, you are working with small, lightweight materials that are easy to manage. You can grow a whole "nursery" of new plants in the space it takes to sit a single dinner plate.
It is also about the variety. Garden centres often stock the same five or six "safe" varieties of herbs or flowers. When you learn to take cuttings, you can swap bits of plants with friends or neighbours. It’s a great way to get hold of heritage varieties or plants that are perfectly suited to your local microclimate. If a plant is thriving on a balcony three doors down, a cutting from it is likely to do just as well on yours.
Beyond the practicalities, there is a real sense of achievement in seeing a tiny sprig of green turn into a flowering bush. It connects you to the rhythm of the seasons in a way that just buying a finished plant doesn't. In the middle of a busy city, watching a root emerge from a stem cutting provides a much-needed moment of calm and a reminder of how resilient nature can be.
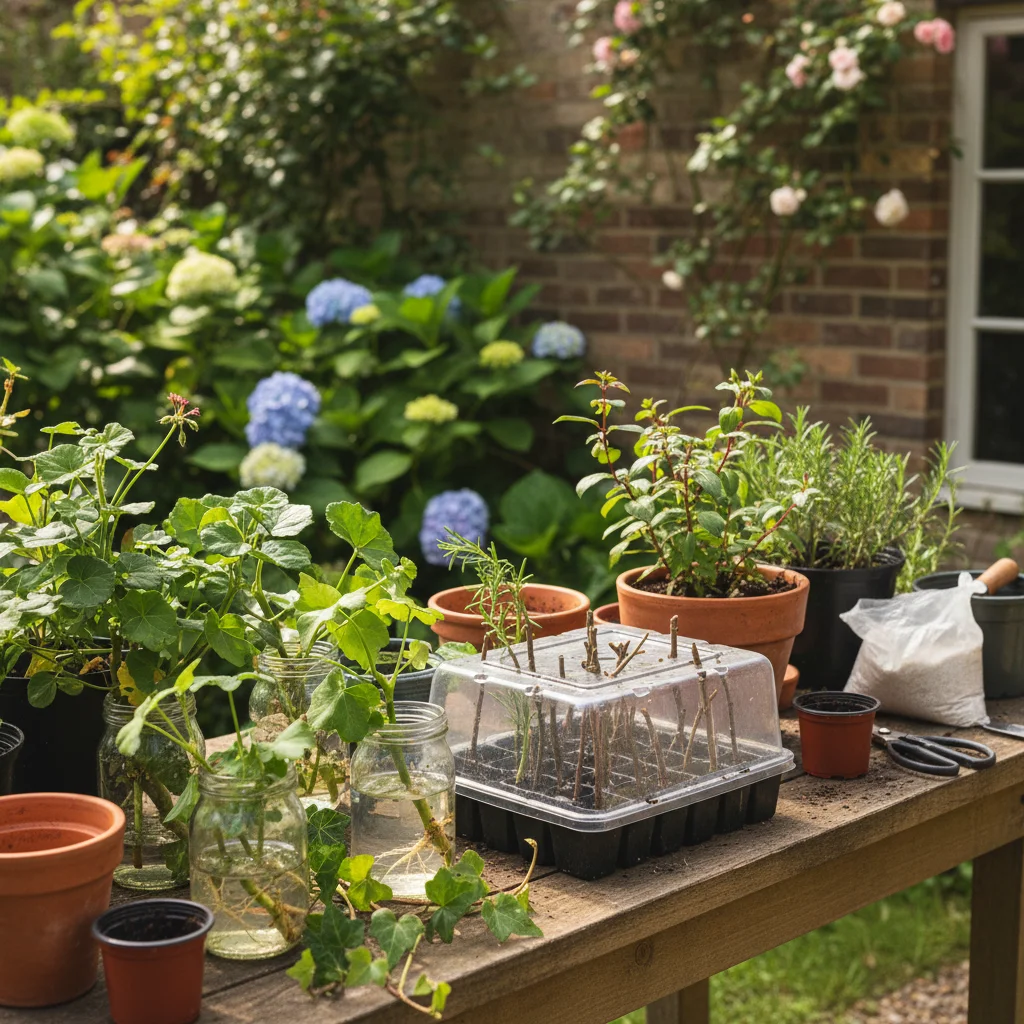
The only tools you really need
You might see fancy propagation kits and heated mats advertised online, but you really don't need them. Most of my most successful plants started life in repurposed containers. We’ve all got old yogurt pots or transparent fruit punnets lying around; these are perfect because they are the right size and easy to poke drainage holes into.
The most important thing is cleanliness. Because you are creating an open "wound" on the plant, you want to make sure you aren't introducing any bacteria. A sharp pair of household scissors or a craft knife will do the job, provided you give them a quick wipe with some boiling water or surgical spirit first.
To get started, you only need a few basics:
- Sharp scissors or a clean craft knife
- Peat-free seed or cuttings compost
- Small pots or cleaned yogurt cartons
- Horticultural grit or perlite for drainage
- Clear plastic bags or a repurposed clear tub
- A pencil or "dibber" to make holes
I always recommend using peat-free compost mixed with a bit of grit or perlite. In small containers, drainage is everything. Cuttings need moisture to survive, but if the soil is a soggy mess, the base of the stem will simply rot before it has a chance to grow roots. A gritty mix allows air to reach the base of the cutting, which is exactly what triggers root growth.
How to master softwood stem cuttings
Softwood cuttings are taken from the fresh, flexible growth that appears in spring and early summer. This is the easiest method for most urban gardeners because the plants are in their peak growing phase and want to put out roots quickly. Think of things like mint, basil, fuchsias, and coleus. These are all perfect candidates for your first attempt.
Find a healthy shoot that doesn't have any flowers on it. Flowers take up a lot of energy, and we want the plant to focus all its strength on making roots. Cut a piece about 10cm long, making the slice just below a "node"—that’s the little bump where a leaf meets the stem. This is where the plant’s natural growth hormones are most concentrated.
Strip off the lower leaves so you have a bare stem to poke into the compost. If you leave leaves buried in the soil, they will rot. I usually leave just two or three leaves at the very top. If those leaves are particularly large, you can even snip them in half to reduce the amount of water the cutting loses through evaporation.
Once your cutting is prepared, use your pencil to make a hole in the damp compost and tuck the stem in. Firm it in gently so there are no air pockets. To keep the humidity high—which is vital when the plant has no roots to drink with—pop a clear plastic bag over the pot. Secure it with a rubber band and keep it in a bright spot, but out of direct, scorching sunlight which would cook the tiny plant.
Growing new plants from just a leaf
Leaf cuttings feel like a bit of a magic trick. You take a single leaf, stick it in some grit, and a few weeks later, a tiny baby plant appears at the base. This method is brilliant for houseplants like Snake Plants (Sansevieria) or succulents like Echeveria, which are staples of the windowsill garden.
For succulents, the key is patience. You need to gently wiggle a leaf off the stem, making sure you get the whole thing. If the leaf snaps in half, it likely won't grow. Leave that leaf on a dry saucer for two or three days until the end "callouses" over. If you put a fresh, wet leaf straight into soil, it will soak up too much water and turn to mush.
Once calloused, simply lay the leaf on top of some gritty compost or poke the base just a few millimetres in. Don't water it yet. The leaf has all the water it needs stored inside. In a few weeks, you’ll see tiny pink roots searching for the soil. Only then should you start misting it lightly.
For plants like the Snake Plant, you can actually cut a long leaf into several 5cm horizontal sections. Just make sure you remember which way is "up." If you plant a leaf segment upside down, it won't grow. Poke the bottom edge into the soil, keep it in a warm spot, and wait. It takes longer than stem cuttings, but it’s a great way to turn one leggy plant into a whole family of new ones.
Taking root cuttings in the dormant season
Root cuttings are usually done in late autumn or winter when the plant is "sleeping." This is a great task for when the balcony feels a bit bleak and you want a gardening project to do indoors. This method works well for plants with thick, fleshy roots like Oriental poppies, acanthus, or even mint if you want to start a fresh pot.
You’ll need to gently lift a bit of the parent plant or tip it out of its pot to get to the roots. Look for roots that are about the thickness of a pencil. Cut a piece off, then carefully put the parent plant back and firm it in—it won't even miss the small bit you’ve taken.
When cutting the root, there’s a traditional trick to help you remember which way is up. Cut the top of the root (the bit that was closest to the stems) straight across. Cut the bottom of the root at an angle. This way, you’ll always know which end should be pointing down into the compost.
Place these root pieces vertically into a pot of gritty compost so the flat top is just level with the surface. Cover them with a thin layer of grit. Keep the pot in a cold frame or a sheltered spot outdoors. You won't see much happening over winter, but by spring, new shoots will start to poke through the grit, signalling that a new root system has formed underneath.
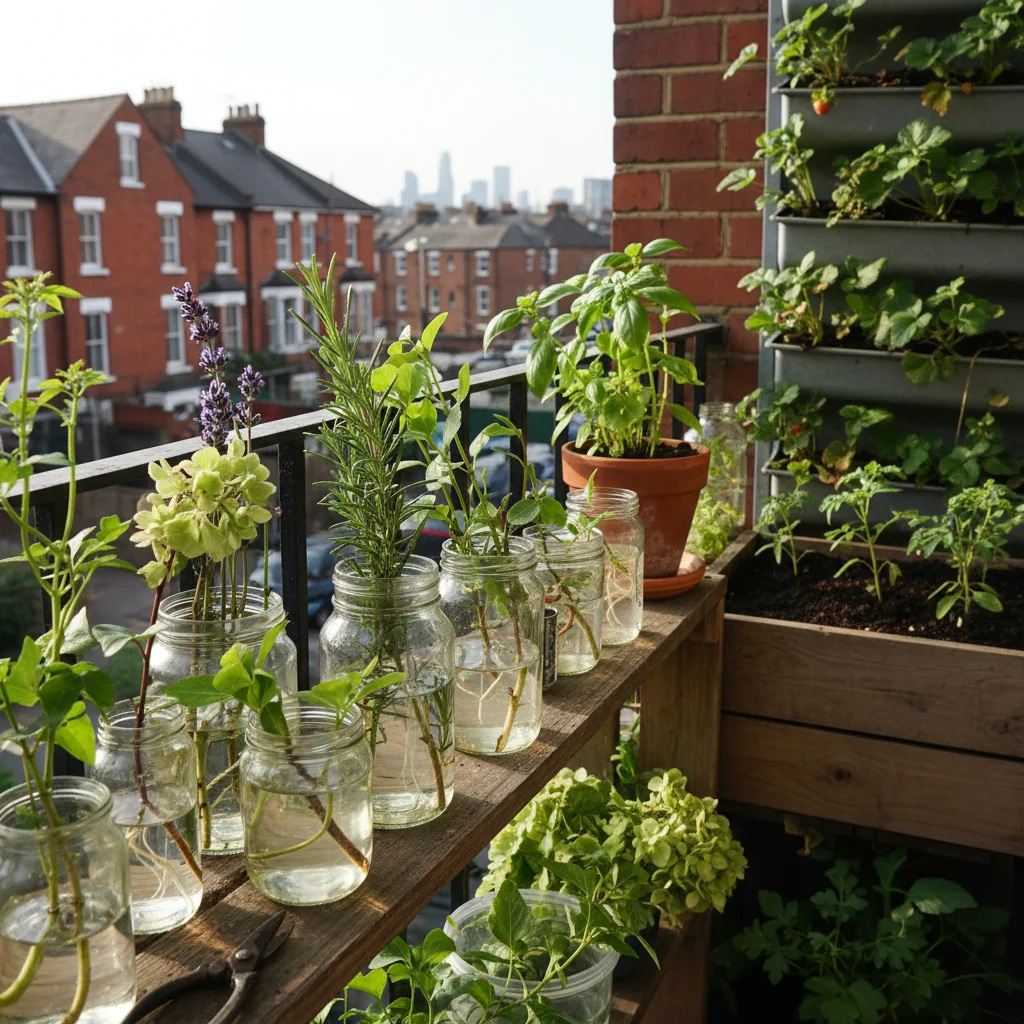
Creating the perfect environment on a windowsill
In an urban flat, your windowsill is your most valuable piece of real estate. However, it can be a tricky environment for baby plants. Central heating can dry out the air, and a south-facing window can become a furnace in mid-July. To give your cuttings the best chance, you need to manage the microclimate.
If your flat is very dry, the "baggie" method is your best friend. Putting a clear bag over your cuttings creates a mini-greenhouse that recycles moisture. Just make sure the bag isn't touching the leaves, as condensation can cause mould. You can use old chopsticks or bent pieces of wire to create a little frame to hold the plastic away from the foliage.
Light is the other big factor. Cuttings need light to photosynthesise, but they don't have the root system to cope with the stress of direct sun. A north or east-facing window is often better than a south-facing one for the first few weeks. If you only have a very sunny window, move the pots a meter or two back from the glass or use a thin net curtain to dapple the light.
Temperature should be consistent. Most cuttings will root happily at room temperature. Avoid putting them directly above a radiator that blasts heat during the day and turns off at night. That kind of temperature swing can stress the plant. A steady, moderate warmth is what encourages those first delicate white roots to emerge.
Common mistakes and how to avoid them
The most common reason cuttings fail is "damping off." This is a fungal disease that causes the stem to turn black and shrivel at the soil line. It usually happens because the compost is too wet or there isn't enough air circulating around the plants. If you see this happening, remove the affected plants immediately and try to give the remaining ones more fresh air by opening the plastic bag for an hour a day.
Another mistake is being too impatient. It is very tempting to keep pulling the cuttings out of the soil to see if they have roots yet. Every time you do this, you break the tiny, microscopic root hairs that are just starting to form. Instead of pulling, look for signs of new growth at the top of the plant. If you see new green leaves appearing, it’s a almost certain sign that there are roots underneath supporting them.
You can also try the "tug test." Very gently, give the cutting a tiny pull. If you feel resistance, it means roots have anchored themselves into the compost. If it slides right out, it’s not ready yet. Just tuck it back in and leave it alone for another week.
Finally, make sure you are choosing the right plants for your space. If you have a very windy balcony, focus on taking cuttings from tougher, woodier plants like lavender or rosemary. Delicate, soft-leaved plants like basil will struggle if you move them straight from a humid windowsill to a breezy balcony. Always "harden off" your new plants by putting them outside for a few hours a day before moving them out permanently.
Moving your new plants to their permanent homes
Once your cuttings have a healthy root system, they are ready to be "potted up." This just means moving them from their nursery pots into something slightly larger with a bit more food in the soil. I usually move mine into individual 9cm pots first rather than putting them straight into a big balcony trough.
In a small garden, we have to be careful with our use of compost. Using a high-quality, peat-free multi-purpose compost for this stage will give the plants the nutrients they need to grow strong. Because the plants are still young, keep a close eye on the watering. Small pots dry out incredibly fast, especially if they are sitting on a sunny ledge or a windy balcony.
If you find yourself with more plants than you have room for—which happens more often than you’d think—this is the perfect time to share. A healthy, home-grown plant in a nice pot makes a better gift than anything you can buy in a shop. It’s a bit of your garden that you can pass on to someone else, and it keeps the cycle of free gardening going.
Propagating your own plants is a bit like having a superpower. It turns a single purchase into a lifetime supply of greenery and allows you to fill every corner of your urban space with life. Start with something simple like a sprig of mint in a glass of water on your kitchen windowsill, and you'll soon find yourself looking at every plant you pass as a potential new addition to your collection.
If you’re looking for more ways to make the most of your small space, why not try growing some quick-harvest salad leaves in a window box to sit alongside your new cuttings? It’s a great way to see results fast while you wait for your new clones to grow.