There is a certain kind of magic that happens in a quiet corner of the garden. It is the moment you stop seeing your potato peelings and grass clippings as rubbish and start seeing them as "black gold." For years, I used to lug heavy, plastic-wrapped bags of compost from the local garden centre to my small Yorkshire plot, wondering why I was paying for something nature provides for free.
If you have ever felt overwhelmed by the idea of "nitrogen ratios" or "aeration cycles," I want to let you in on a secret. Composting is far easier than the textbooks make it sound. In fact, if you can pile things up and leave them alone, you are already halfway there. You don't need a massive garden or expensive equipment to start making the best soil you’ve ever used.
Making your own compost is one of the most rewarding things you can do as a gardener. It improves your soil structure, feeds your plants, and saves a huge amount of waste from going to landfill. Best of all, it gives you a deeper connection to the cycle of your garden, from the first spring shoots to the final autumn harvest.
How composting works for you
At its simplest level, composting is just the natural process of rot, sped up slightly by us. In a typical UK woodland, leaves fall to the ground, insects and fungi move in, and by the following year, those leaves have become rich, crumbly soil. We are simply recreating that process in a bin or a pile in our own back gardens.
You don't need to be a scientist to get this right. The microscopic organisms that do the hard work for us—the bacteria and fungi—only need three things to thrive: food, water, and air. If you provide those, they will happily turn your kitchen scraps into nutrient-rich food for your roses, tomatoes, and herbs.
One of the biggest benefits of home composting is knowing exactly what is in your soil. With the move away from peat-based products in the UK, making your own ensures you have a sustainable, peat-free supply of goodness right at your fingertips. It is better for the environment and significantly better for your bank balance.
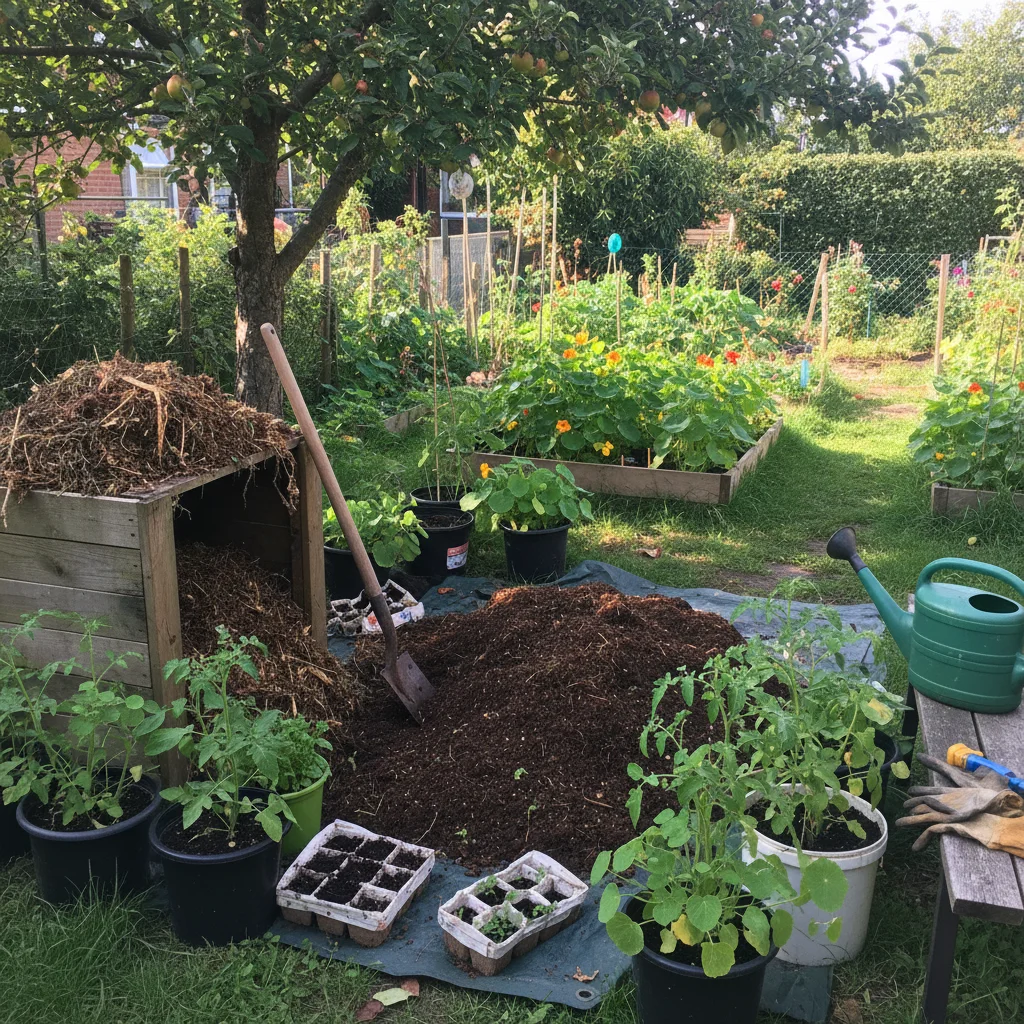
Finding the right spot for your bin
You don't need a huge amount of space to get started. I’ve seen wonderful compost systems on tiny patios using small plastic bins, and even wormeries on apartment balconies. If you have a bit of soil to place a bin on, that is ideal, as it allows worms and drainage to move freely between the heap and the earth.
Choose a spot that is easy to get to, especially in the middle of a rainy January. If your bin is at the very bottom of a long, muddy garden, you might find yourself less inclined to take the vegetable peelings out. A tucked-away corner that gets a bit of sun or partial shade is perfect for keeping the process ticking over.
If you are worried about how it looks, you can easily screen a compost area with some trellis or a few tall plants like sunflowers or runner beans. Most modern plastic "dalek" bins are quite unobtrusive and do a brilliant job of keeping the heat in. If you have a larger space, a simple wooden bay made from old pallets is a classic, cost-effective choice.
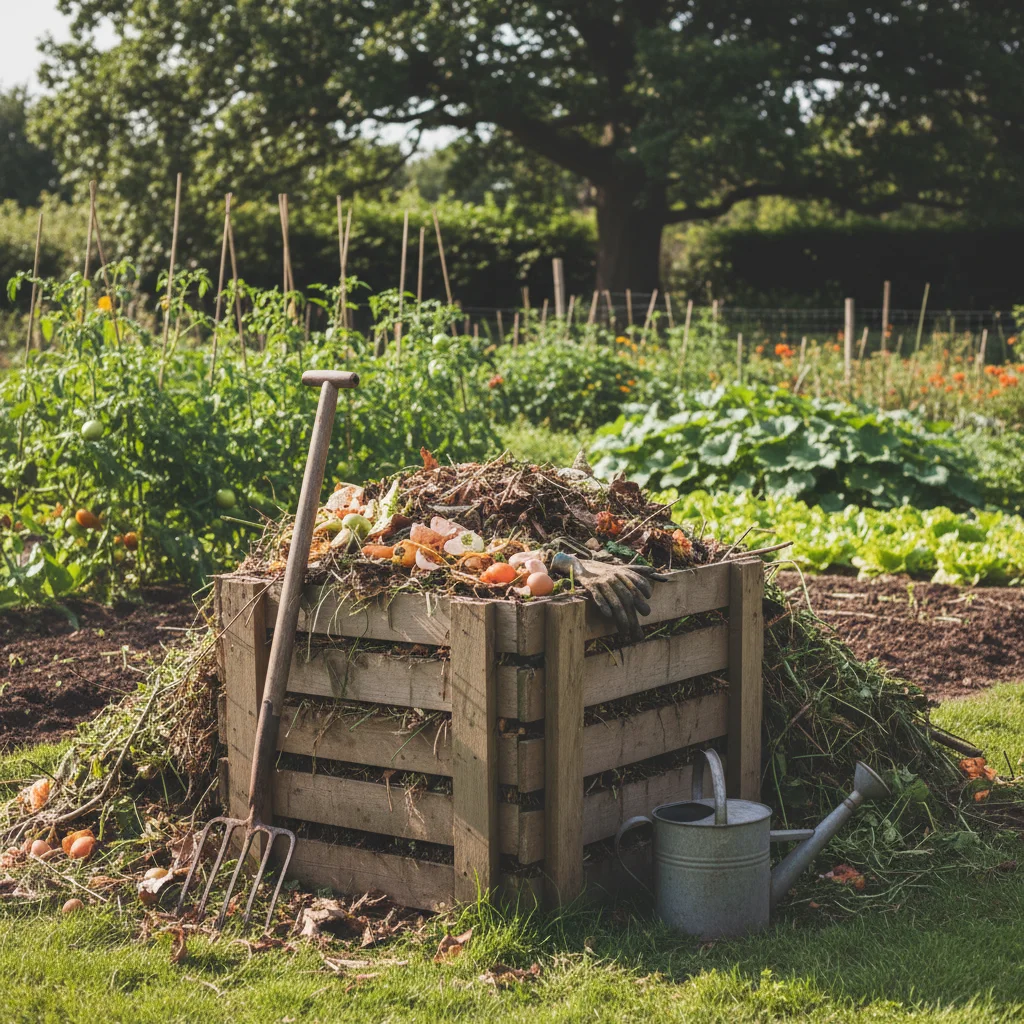
The secret balance of greens and browns
To keep your compost healthy and smelling fresh, you just need to remember two categories of ingredients: "greens" and "browns." Greens are your nitrogen-rich materials, which provide the protein for the tiny organisms. Browns are carbon-rich materials, which act as the fuel and provide the structure that lets air into the heap.
A common mistake is adding too many greens, like grass clippings, which can turn into a slimy, smelly mess. On the other hand, a pile of only brown cardboard will sit there for years without changing. The trick is to aim for roughly half of each, though you don't need to be precise. I usually just try to throw in a handful of ripped-up cardboard every time I empty the kitchen caddy.
What you can put in your heap
Most of what you need for a great compost heap is already in your house and garden. It’s about creating a varied diet for your soil microbes. Here is a simple breakdown of the things you should be collecting to build your first batch of garden gold:
- Vegetable peelings and fruit scraps from your kitchen (Greens)
- Used coffee grounds and tea leaves, which worms absolutely love (Greens)
- Grass clippings, but only in thin layers to avoid matting (Greens)
- Cardboard boxes, egg cartons, and toilet roll tubes, all ripped into small pieces (Browns)
- Dry autumn leaves, which are a fantastic source of carbon (Browns)
- Prunings and hedge clippings, ideally chopped or shredded first (Browns)
By mixing these items together, you create the perfect environment for decomposition. I like to keep a bag of dry leaves or a stack of flattened cardboard next to my bin. This makes it easy to add a "brown" layer whenever the heap starts looking a bit too wet or green.
Managing your heap with minimal effort
Many gardening books suggest "turning" your compost every week with a garden fork. While this does speed things up by adding air, it is also a lot of hard work. If you are a busy gardener or have limited mobility, you can absolutely have a "no-turn" heap. It will just take a little longer to be ready.
If you want to help things along without the heavy lifting, you can use a compost aerator tool or simply poke a sturdy stick into the heap and wiggle it around. This creates air pockets that prevent the pile from becoming compacted. In a typical UK summer, the heat will do much of the work for you, but even in winter, the microbes will keep working, albeit at a slower pace.
Keep an eye on the moisture levels. Your compost should feel like a wrung-out sponge—damp but not dripping wet. If we have a particularly dry spell, you might need to give it a quick splash of water. Conversely, if it’s a typical British washout, make sure your bin has a lid or a piece of old carpet over the top to stop it from becoming waterlogged.
Items to keep out of your compost
While most organic matter can be composted, there are a few things that are best left out of a home system. This is mainly to avoid attracting unwanted visitors like rats or to prevent the spread of diseases and weeds that a home heap might not get hot enough to kill.
Avoid adding meat, dairy, or cooked food, as these can smell and attract pests. You should also leave out cat or dog litter for hygiene reasons. While most garden weeds are fine, try to avoid "persistent" weeds like ground elder or couch grass, as their roots can survive the composting process and end up back in your flower beds.
I also avoid putting in thick woody branches unless they have been through a shredder. They take a very long time to break down and can make the finished compost difficult to spread. If you have a lot of large woody waste, it’s often better to create a separate "dead hedge" or log pile to support local wildlife like hedgehogs and beetles.
How to tell when your compost is ready
The time it takes for compost to finish depends on the weather and what you’ve put in it. In a warm summer, you might have usable soil in six months. In a colder spot or if you haven't turned the pile, it might take a year or more. Patience is a virtue here, but the results are always worth the wait.
Your compost is ready when it looks dark, crumbly, and smells like a fresh forest floor. You shouldn't be able to recognise the original ingredients—no more banana skins or eggshells should be visible. It will likely be at the bottom of the bin, so many plastic bins have a little hatch at the base for you to harvest the finished product.
Don't worry if there are still a few stubborn bits of twig or eggshell left. You can simply sieve these out and put them back into the top of the bin to go around again. The fine, dark material that remains is what you want to use. It is packed with beneficial bacteria and nutrients that will give your plants a massive boost.
Using your garden gold
Once you have your first batch of homemade compost, the possibilities are endless. I love using mine as a mulch around the base of my roses and fruit bushes in early spring. This helps to suppress weeds and keep moisture in the soil during the summer months.
You can also mix it into the soil of your vegetable beds before planting out your young seedlings. It’s particularly good for "hungry" plants like courgettes and pumpkins. If you grow in pots on a patio, you can mix your homemade compost with some grit or leaf mould to create a bespoke potting mix that is far superior to anything you can buy in a plastic bag.
Starting your first compost heap is a small step that makes a huge difference to your garden's health. It’s a quiet, satisfying way to give back to the earth and ensure your plants have everything they need to thrive. Once you see the difference it makes to your soil, you’ll wonder why you ever bothered with the garden centre queues.
The best time to start is today. Grab a container for your kitchen, find a corner of the garden, and start collecting those scraps. Before you know it, you'll be harvesting your very own garden gold and watching your plants grow stronger than ever before.--- title: "Never Buy Compost Again: The Simple Way to Start" seo_title: "Turn Kitchen Scraps Into Rich Garden Soil" meta_description: "Stop throwing away garden gold. Learn how to turn kitchen waste into free, nutrient-rich compost with our simple guide. Start your heap today." category: "soil-and-compost" date: "2024-05-22" slug: "simple-way-start-composting" excerpt: "Learn how to transform your kitchen scraps and garden clippings into nutrient-rich soil without the hard work or expensive equipment." focus_keyword: "home composting" author: "emma-greenwood"
There is a certain kind of magic that happens in a quiet corner of the garden. It is the moment you stop seeing your potato peelings and grass clippings as rubbish and start seeing them as "black gold." For years, I used to lug heavy, plastic-wrapped bags of compost from the local garden centre to my small Yorkshire plot, wondering why I was paying for something nature provides for free.
If you have ever felt overwhelmed by the idea of "nitrogen ratios" or "aeration cycles," I want to let you in on a secret. Composting is far easier than the textbooks make it sound. In fact, if you can pile things up and leave them alone, you are already halfway there. You don't need a massive garden or expensive equipment to start making the best soil you’ve ever used.
Making your own compost is one of the most rewarding things you can do as a gardener. It improves your soil structure, feeds your plants, and saves a huge amount of waste from going to landfill. Best of all, it gives you a deeper connection to the cycle of your garden, from the first spring shoots to the final autumn harvest.
How composting works for you
At its simplest level, composting is just the natural process of rot, sped up slightly by us. In a typical UK woodland, leaves fall to the ground, insects and fungi move in, and by the following year, those leaves have become rich, crumbly soil. We are simply recreating that process in a bin or a pile in our own back gardens.
You don't need to be a scientist to get this right. The microscopic organisms that do the hard work for us—the bacteria and fungi—only need three things to thrive: food, water, and air. If you provide those, they will happily turn your kitchen scraps into nutrient-rich food for your roses, tomatoes, and herbs.
One of the biggest benefits of home composting is knowing exactly what is in your soil. With the move away from peat-based products in the UK, making your own ensures you have a sustainable, peat-free supply of goodness right at your fingertips. It is better for the environment and significantly better for your bank balance.
Finding the right spot for your bin
You don't need a huge amount of space to get started. I’ve seen wonderful compost systems on tiny patios using small plastic bins, and even wormeries on apartment balconies. If you have a bit of soil to place a bin on, that is ideal, as it allows worms and drainage to move freely between the heap and the earth.
Choose a spot that is easy to get to, especially in the middle of a rainy January. If your bin is at the very bottom of a long, muddy garden, you might find yourself less inclined to take the vegetable peelings out. A tucked-away corner that gets a bit of sun or partial shade is perfect for keeping the process ticking over.
If you are worried about how it looks, you can easily screen a compost area with some trellis or a few tall plants like sunflowers or runner beans. Most modern plastic "dalek" bins are quite unobtrusive and do a brilliant job of keeping the heat in. If you have a larger space, a simple wooden bay made from old pallets is a classic, cost-effective choice.
The secret balance of greens and browns
To keep your compost healthy and smelling fresh, you just need to remember two categories of ingredients: "greens" and "browns." Greens are your nitrogen-rich materials, which provide the protein for the tiny organisms. Browns are carbon-rich materials, which act as the fuel and provide the structure that lets air into the heap.
A common mistake is adding too many greens, like grass clippings, which can turn into a slimy, smelly mess. On the other hand, a pile of only brown cardboard will sit there for years without changing. The trick is to aim for roughly half of each, though you don't need to be precise. I usually just try to throw in a handful of ripped-up cardboard every time I empty the kitchen caddy.
What you can put in your heap
Most of what you need for a great compost heap is already in your house and garden. It’s about creating a varied diet for your soil microbes. Here is a simple breakdown of the things you should be collecting to build your first batch of garden gold:
- Vegetable peelings and fruit scraps from your kitchen (Greens)
- Used coffee grounds and tea leaves, which worms absolutely love (Greens)
- Grass clippings, but only in thin layers to avoid matting (Greens)
- Cardboard boxes, egg cartons, and toilet roll tubes, all ripped into small pieces (Browns)
- Dry autumn leaves, which are a fantastic source of carbon (Browns)
- Prunings and hedge clippings, ideally chopped or shredded first (Browns)
By mixing these items together, you create the perfect environment for decomposition. I like to keep a bag of dry leaves or a stack of flattened cardboard next to my bin. This makes it easy to add a "brown" layer whenever the heap starts looking a bit too wet or green.
Managing your heap with minimal effort
Many gardening books suggest "turning" your compost every week with a garden fork. While this does speed things up by adding air, it is also a lot of hard work. If you are a busy gardener or have limited mobility, you can absolutely have a "no-turn" heap. It will just take a little longer to be ready.
If you want to help things along without the heavy lifting, you can use a compost aerator tool or simply poke a sturdy stick into the heap and wiggle it around. This creates air pockets that prevent the pile from becoming compacted. In a typical UK summer, the heat will do much of the work for you, but even in winter, the microbes will keep working, albeit at a slower pace.
Keep an eye on the moisture levels. Your compost should feel like a wrung-out sponge—damp but not dripping wet. If we have a particularly dry spell, you might need to give it a quick splash of water. Conversely, if it’s a typical British washout, make sure your bin has a lid or a piece of old carpet over the top to stop it from becoming waterlogged.
Items to keep out of your compost
While most organic matter can be composted, there are a few things that are best left out of a home system. This is mainly to avoid attracting unwanted visitors like rats or to prevent the spread of diseases and weeds that a home heap might not get hot enough to kill.
Avoid adding meat, dairy, or cooked food, as these can smell and attract pests. You should also leave out cat or dog litter for hygiene reasons. While most garden weeds are fine, try to avoid "persistent" weeds like ground elder or couch grass, as their roots can survive the composting process and end up back in your flower beds.
I also avoid putting in thick woody branches unless they have been through a shredder. They take a very long time to break down and can make the finished compost difficult to spread. If you have a lot of large woody waste, it’s often better to create a separate "dead hedge" or log pile to support local wildlife like hedgehogs and beetles.
How to tell when your compost is ready
The time it takes for compost to finish depends on the weather and what you’ve put in it. In a warm summer, you might have usable soil in six months. In a colder spot or if you haven't turned the pile, it might take a year or more. Patience is a virtue here, but the results are always worth the wait.
Your compost is ready when it looks dark, crumbly, and smells like a fresh forest floor. You shouldn't be able to recognise the original ingredients—no more banana skins or eggshells should be visible. It will likely be at the bottom of the bin, so many plastic bins have a little hatch at the base for you to harvest the finished product.
Don't worry if there are still a few stubborn bits of twig or eggshell left. You can simply sieve these out and put them back into the top of the bin to go around again. The fine, dark material that remains is what you want to use. It is packed with beneficial bacteria and nutrients that will give your plants a massive boost.
Using your garden gold
Once you have your first batch of homemade compost, the possibilities are endless. I love using mine as a mulch around the base of my roses and fruit bushes in early spring. This helps to suppress weeds and keep moisture in the soil during the summer months.
You can also mix it into the soil of your vegetable beds before planting out your young seedlings. It’s particularly good for "hungry" plants like courgettes and pumpkins. If you grow in pots on a patio, you can mix your homemade compost with some grit or leaf mould to create a bespoke potting mix that is far superior to anything you can buy in a plastic bag.
Starting your first compost heap is a small step that makes a huge difference to your garden's health. It’s a quiet, satisfying way to give back to the earth and ensure your plants have everything they need to thrive. Once you see the difference it makes to your soil, you’ll wonder why you ever bothered with the garden centre queues.
The best time to start is today. Grab a container for your kitchen, find a corner of the garden, and start collecting those scraps. Before you know it, you'll be harvesting your very own garden gold and watching your plants grow stronger than ever before.