November in the city often feels like a race against the fading light. As the last of the autumn leaves skitter across our patios and balconies, it is easy to think the gardening year is over. However, this month offers a golden window for one of the most satisfying jobs in the urban garden: the final hedge trim.
Tidying up your hedges now ensures your outdoor space looks intentional and cared for throughout the bleakest months of the year. In a small garden or on a terrace, a shaggy, overgrown hedge can make the whole area feel cramped and dark. A quick, disciplined prune restores a sense of order and structure that carries us through to spring.
We often focus on the flowers and the harvests, but the "bones" of the garden are what keep us sane in January. Whether you have a classic privet boundary or a few troughs of box hedging providing privacy on a balcony, November is the time to act. It is about more than just aesthetics; it is about the health of the plants and the wildlife that shares our urban pockets.
Why November is the ideal time to prune

By the time November arrives, most of our common garden hedges have entered their dormant phase. Growth has slowed right down as the temperatures drop, meaning any cuts you make now will hold their shape until the sap starts rising again in March. This saves you from having to head out with the shears in the middle of a freezing January.
For those of us in built-up areas, November also marks the end of the busy bird-nesting season. It is much safer to prune now without the risk of disturbing a family of blackbirds or wrens. While we always check for late nesters, the autumn chill usually means the birds have finished their domestic duties and are focused on finding food.
Pruning now also helps prevent wind damage during winter gales. A tall, top-heavy hedge acts like a sail, catching the wind and putting immense pressure on the roots. This is particularly dangerous for hedges grown in large containers on exposed balconies or roof terraces. Reducing the height and thinning out the bulk allows the wind to pass through more easily.
Identifying which hedges need attention
Not every plant wants a haircut in late autumn, so it helps to know what you are looking at. In most UK urban gardens, we deal with a handful of reliable stalwarts. Deciduous hedges, like beech or hornbeam, are perfect candidates for a November tidy-up if they have become a bit unruly over the summer.
Evergreens are a slightly different story but still benefit from a light touch. If you have a privet or a lonicera hedge that has put on a late growth spurt, you can safely trim it back to keep it looking sharp. The goal here isn't a hard renovation prune, but rather a "short back and sides" to maintain the silhouette.
If you are growing formal box hedging in pots to frame a doorway or line a balcony, November is your last chance to sharpen those edges. We want these plants to look architectural and crisp against the winter frost. Just be sure to pick a dry day to prevent any fungal issues from settling into the fresh cuts.
| Hedge Type | Pruning Style | Best Tool |
|---|---|---|
| Privet | Light trim for shape | Hand shears |
| Box (Buxus) | Formal sharpening | Small topiary shears |
| Beech / Hornbeam | Tidy wayward branches | Secateurs |
| Yew | Structural thinning | Long-handled loppers |
| Lavender (Hedge) | Remove spent stalks | Sharp secateurs |
Tools for the urban gardener
You don't need a massive shed full of power tools to keep a small-space hedge in check. In fact, for most city gardens, manual tools are often better because they give you more control and don't disturb the neighbours with constant noise. A sharp pair of shears is usually the most important investment you will make.
Maintenance is just as important as the pruning itself. We have all made the mistake of grabbing a rusty pair of shears from the back of the cupboard, only to find they chew the stems rather than cutting them. Clean, sharp blades make the job faster and are much better for the plant’s health, as clean cuts heal more quickly.
For those with limited storage, multi-purpose tools are a lifesaver. You can manage a surprising amount of hedging with just a good pair of bypass secateurs and some lightweight shears. If your hedge is particularly tall or you are working on a balcony where space is tight, look for tools with telescopic handles to avoid needing a bulky ladder.
- Bypass secateurs for thin, woody stems and precision work.
- Manual hedge shears for creating flat surfaces and straight lines.
- Long-handled loppers for thicker branches at the base of the hedge.
- A stiff brush to clear away debris from the centre of the plant.
- Sharpening stone to keep your blades honed between sessions.
- Disinfectant spray to clean blades and prevent the spread of disease.
Mastering the perfect pruning technique
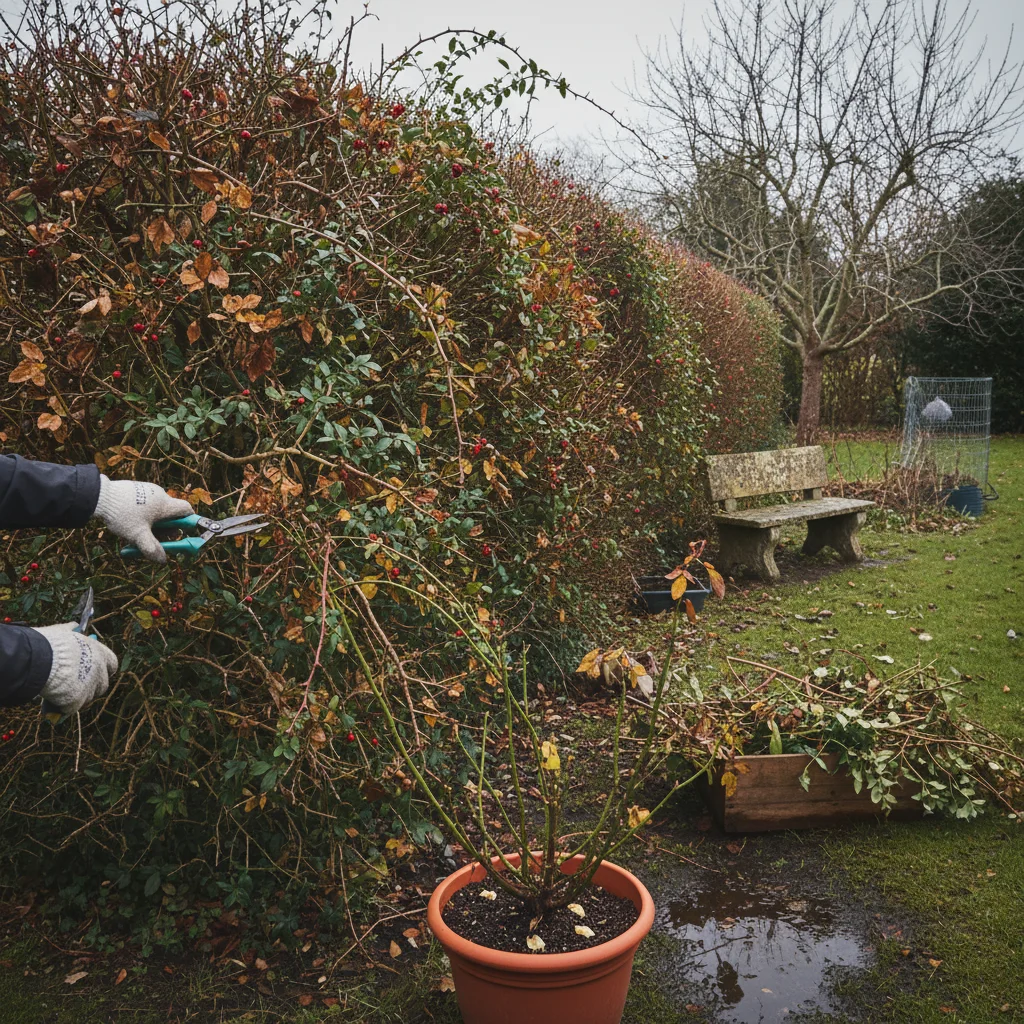
When you start pruning, the most common mistake is to cut the sides perfectly vertical. In a small garden, this actually causes the bottom of the hedge to go thin and leggy because the top blocks out the light. Instead, aim for a "tapered" shape, where the bottom is slightly wider than the top.
This "A" shape allows sunlight to reach the lower leaves, even during the low-angled sun of a British winter. It keeps the hedge thick and lush all the way to the ground, which is essential for privacy in overlooked urban spaces. Even a slight taper of a few centimetres can make a massive difference to the plant's long-term health.
Start from the bottom and work your way up. This prevents the cut branches from getting caught in the lower growth, making it easier to see the shape as you go. Use slow, deliberate strokes with your shears, and step back frequently to check your progress. It is much easier to take a little more off than it is to wait months for a hole to grow back.
Managing hedges in pots and containers
Many of us in the city rely on "instant hedging" in troughs or large pots to create a green screen. These plants need a bit more care during a November prune because their root systems are restricted. You want to remove the bulk without shocking the plant right before the first hard frost hits.
When pruning container hedges, focus on removing any dead or diseased wood first. This opens up the centre of the plant for better air circulation, which is vital in damp, stagnant urban corners. If the hedge is meant to be a privacy screen, keep the top slightly higher than the surrounding pots to maintain your "green wall" effect.
After pruning, it is a good idea to give your container hedges a bit of a winter boost. While we don't want to encourage new soft growth with nitrogen-heavy feed, a thin mulch of compost on the surface of the pot helps protect the roots. It also keeps the plant hydrated, as winter winds can dry out pots surprisingly quickly.
Wildlife and the urban environment
Our hedges are more than just fences; they are vital corridors for city wildlife. Even a small hedge on a patio can provide a home for beneficial insects or a hiding spot for a hedgehog. When pruning in November, try not to be too "neat" in the areas that aren't visible to the eye.
Leaving a bit of leaf litter at the base of the hedge provides a perfect overwintering spot for ladybirds and lacewings. These are the very insects that will help you manage aphids and pests come spring. If you find any old bird nests while you are trimming, you can usually remove them now, but check carefully for any hibernating creatures first.
If your hedge produces berries, like hawthorn or certain types of privet, try to leave a few sections unpruned. These berries are a lifeline for birds during a cold snap when other food sources are scarce. Balancing a tidy appearance with a bit of "wild" space is the hallmark of a successful urban gardener.
Dealing with the clippings
One of the biggest challenges in a small garden is what to do with the mountain of green waste. If you have a council garden waste bin, you are in luck, but many of us have to be more creative. You can chop smaller clippings up finely and use them as a mulch around the base of your larger shrubs.
If the stems are thin enough, you can even add them to a small home composting bin, provided you mix them with plenty of "brown" material like shredded cardboard. Avoid composting any diseased wood, particularly if you suspect box blight. That material should always be bagged up and disposed of in the general waste to prevent the spores from spreading.
For those with absolutely no space for waste, some local authorities offer seasonal "shredding days" or community composting schemes. It is always worth checking with your local allotment group too. Often, they are happy to take clean hedge clippings to add to their larger piles, turning your garden waste into future soil for the community.
Timing your prune with the UK weather
In the UK, November weather is notoriously unpredictable. One day it is a mild twelve degrees, and the next, there is a biting frost. The best time to prune is a dry, overcast day. Avoid pruning when it is actually freezing, as the frozen stems can shatter when cut, leading to jagged wounds that don't heal well.
Likewise, try to avoid pruning just before a heavy rainstorm. Wet weather can wash fungal spores into fresh cuts before they have had a chance to seal over. If the forecast looks particularly grim, it is better to wait a week for a clear spell. Your hedge won't mind waiting, but it will certainly mind being pruned in a deluge.
Keep an eye on the local frost dates for your part of the UK. In London and other southern cities, we often get a bit of a "heat island" effect that keeps the frosts at bay until later in the month. This gives us a slightly longer window to get the job done compared to our friends further north.
Taking the time to tidy your hedges this month is one of the best gifts you can give your future self. When you look out the window on a grey Tuesday in February, you will be glad to see a structured, neat garden rather than a tangled mess. Once the shears are cleaned and put away, you can head back inside, put the kettle on, and enjoy the satisfaction of a job well done.